1960 Split Window Resto/Rebuild
Moderators: warb, Rawdyn, Leroy, byronbus, Tonz Magonz, dmb
-
morts
- DSKer
- Posts: 2097
- Joined: Sun Oct 29, 2006 9:22 pm
- Location: McLaren Vale, South Australia
Re: 1960 Split Window Resto/Rebuild
I'm looking to build a new shed and was wondering how high your walls are. It seems from the pics ideally you would like a little more height to be able to work under the bus while standing up??
No matter what happens they can't take you out in the street and shoot you......
-
VRSenator065

- DSKer
- Posts: 576
- Joined: Sun Jun 01, 2014 9:47 pm
- Location: Gawler SA
Re: 1960 Split Window Resto/Rebuild
Yea mine is 2.4. I regret it. Should have gone 2.7 or even 3. My hoist is a half height. It lifts to 1.3m. Which is great on a wheely stool. But honestly full height is best.
-
VRSenator065
- DSKer
- Posts: 576
- Joined: Sun Jun 01, 2014 9:47 pm
- Location: Gawler SA
Re: 1960 Split Window Resto/Rebuild
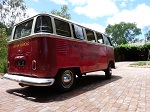
Woo Hoo, our beautiful Creative Engineering polished aluminium front door window assemblies have arrived from the UK. Can not wait to do a test fit and see how they look.

-
morts
- DSKer
- Posts: 2097
- Joined: Sun Oct 29, 2006 9:22 pm
- Location: McLaren Vale, South Australia
Re: 1960 Split Window Resto/Rebuild
ThanksVRSenator065 wrote:Yea mine is 2.4. I regret it. Should have gone 2.7 or even 3. My hoist is a half height. It lifts to 1.3m. Which is great on a wheely stool. But honestly full height is best.
No matter what happens they can't take you out in the street and shoot you......
-
VRSenator065
- DSKer
- Posts: 576
- Joined: Sun Jun 01, 2014 9:47 pm
- Location: Gawler SA
Re: 1960 Split Window Resto/Rebuild
Couldn't resist a quick test fit. Got a full weekend of social stuff, so no Walter work for a while though unfortunately.

-
VRSenator065
- DSKer
- Posts: 576
- Joined: Sun Jun 01, 2014 9:47 pm
- Location: Gawler SA
Re: 1960 Split Window Resto/Rebuild
Another day. It's one thing I learnt with the Senator, I think it's across anyone's build. Sometimes you get days where you just nail it, stand back at the end and go wow, that's progress. Other days like today is just fiddle, cut, fiddle, cut, weld, grind repeat. At the end you look and go is that all. A bit like that today. A very funky piece I needed to hand-make for the back of the passenger B pillar. Messing around with the shrinker/stretcher. But came out well enough I think, not totally finished off, but enough for now. More social crap tomorrow, hanging to get a few weekends where I can get really stuck into it. But slow and steady wins the race I guess. Few pics for posterity.


-
D-Train

- DSKer
- Posts: 3510
- Joined: Mon Nov 28, 2005 3:03 pm
- Location: coffs harbour
Re: 1960 Split Window Resto/Rebuild
How’s those window frames feel? They look the part, do they have a coating on them or just polished?
-
VRSenator065
- DSKer
- Posts: 576
- Joined: Sun Jun 01, 2014 9:47 pm
- Location: Gawler SA
Re: 1960 Split Window Resto/Rebuild
Took a bit of a break from the forum. Been doing bit and pieces here and there, the floor is in etc. Have just started 3 weeks holidays so hoping to give the project a bit of a kick along. The first order of attention is the rear hatch area. Its I think like most, badly rusted away at the top where the hinge bolts on. One thing I am really thankful for is that the VW crew in SA are super helpful. And having Cooper literally up the road from me, and so free to offer advice or share his knowledge is bloody awesome. He invited me to his workshop today and we (he, ha ha) made up the strengthening pieces that goes across the top inside the channel. Also folded up some repair pieces.
Yesterday I knocked up the nut plate and some repair pieces for the "columns". I do really enjoy how I can start off with a small piece of flat sheet and fiddle away and come up with some tricky little shapes, very cool. So been playing around and have the new rear piece let in, it's not welded yet. So tomorrows aim is to build up the assembly. Make up some retainers for the nut plate, get that in, and the strengthener etc, then see how far I get, I may even get it in.
Also done a big order with Creative, for all the polished windows, front safaris, rear safari, side pop-outs, and also two side safaris. And also have the rack and pinion steering conversion coming over too.
Few pics to get the thread back up to speed on where I am at, apologies there are so many!
-
Zimblewinder

- DSKer
- Posts: 1356
- Joined: Fri May 20, 2005 9:28 am
- Location: Geeeeeelong
Re: 1960 Split Window Resto/Rebuild
Looks really neat. The hinge hanger looks good. I only very recently saw those repopped on thesamba. Wish they'd come around earlier. Not the simplest fab. What's a "side safari"?
March 58 Euro 23.
April 59 Mango
Wanted:
59 crank handle (tick!)
cargo door outer handle 59
two perfect rear floor mats (pretty pretty please!!!)
April 59 Mango
Wanted:
59 crank handle (tick!)
cargo door outer handle 59
two perfect rear floor mats (pretty pretty please!!!)
-
VRSenator065
- DSKer
- Posts: 576
- Joined: Sun Jun 01, 2014 9:47 pm
- Location: Gawler SA
Re: 1960 Split Window Resto/Rebuild
Not the greatest pic, but sort of like a pop-out only they hinge from the top. We just thought they were something different for the rear two side windows.

BTW, I can't remember what my password is on here, and this PC automatically logs me on but I can't get it on my phone or work PC. But it seems I need to know my old password to create a new one (catch 22) I have tried contacting admins with no luck. Any ideas?
BTW, I can't remember what my password is on here, and this PC automatically logs me on but I can't get it on my phone or work PC. But it seems I need to know my old password to create a new one (catch 22) I have tried contacting admins with no luck. Any ideas?
-
Griffin

- DSKer
- Posts: 851
- Joined: Sun Nov 19, 2006 3:32 pm
- Location: Freo
- Contact:
Re: 1960 Split Window Resto/Rebuild
the only thing with those Creative front safari is that they come disassembled and are a bitch to put together and have all their rubbers nice....
Gordon
http://www.allaircooled.com.au
63 SC my daily driver
62 11 window
60 23
68 Country Buggy KO329
53 Westfalia trailer
56 shorty kombi (sold)
59 SC (sold)
68 Country Buggy KO418 (sold)
67 PMG sold (sold)
61 Karmann Ghia - (the wifes) sold
http://www.allaircooled.com.au
63 SC my daily driver
62 11 window
60 23
68 Country Buggy KO329
53 Westfalia trailer
56 shorty kombi (sold)
59 SC (sold)
68 Country Buggy KO418 (sold)
67 PMG sold (sold)
61 Karmann Ghia - (the wifes) sold
-
VRSenator065
- DSKer
- Posts: 576
- Joined: Sun Jun 01, 2014 9:47 pm
- Location: Gawler SA
Re: 1960 Split Window Resto/Rebuild
At least it will make a change from cutting/grinding/welding...griffin wrote:the only thing with those Creative front safari is that they come disassembled and are a bitch to put together and have all their rubbers nice....
-
Zimblewinder
- DSKer
- Posts: 1356
- Joined: Fri May 20, 2005 9:28 am
- Location: Geeeeeelong
Re: 1960 Split Window Resto/Rebuild
Stick with it. Messaging Byronbus is your only real hope. Somehow Dion hooked me up last time I was cut off. Drop him a PM. Maybe he has a batphone.
The side safaris are interesting, you could do a bus theme advent calendar this coming Christmas
The side safaris are interesting, you could do a bus theme advent calendar this coming Christmas
March 58 Euro 23.
April 59 Mango
Wanted:
59 crank handle (tick!)
cargo door outer handle 59
two perfect rear floor mats (pretty pretty please!!!)
April 59 Mango
Wanted:
59 crank handle (tick!)
cargo door outer handle 59
two perfect rear floor mats (pretty pretty please!!!)
-
VRSenator065
- DSKer
- Posts: 576
- Joined: Sun Jun 01, 2014 9:47 pm
- Location: Gawler SA
Re: 1960 Split Window Resto/Rebuild
LOL, great day today, felt great not having to rush like on a weekend. Feel like I got a lot done. I am guessing you guys that have done it know that the "assembly" across the top above the rear hatch is a pretty complicated little bit of kit, especially if yours is non-existent so not really anything to go on. But I am happy how it's turning out, ready for welding in tomorrow hopefully.


-
VRSenator065
- DSKer
- Posts: 576
- Joined: Sun Jun 01, 2014 9:47 pm
- Location: Gawler SA
Re: 1960 Split Window Resto/Rebuild
Well, that's the rear hatch area done and dusted. Big relief. The last really major bit I think, tbh was dreading it a bit. Turned out to be complicated but not hard if that makes sense. Put the stretcher to work and started making up my internal channel replacements. very happy with the progress so far. And, of course, the main thing is the customer is happy


