My 62 11 window resto - she is finished!(new pics 24 June)
Moderators: warb, Rawdyn, Leroy, byronbus, Tonz Magonz, dmb
-
- DSKer
- Posts: 194
- Joined: Tue Feb 19, 2008 9:14 pm
My 62 11 window resto - she is finished!(new pics 24 June)
G'day all, Jason here. Thought I'd introduce myself (hi ), and give you a run down on my new project. Some of you regular visits to the Kombi forum may of already seen this - anyway, bought her 6 or so weeks ago, after being in a shed covered in dust for 19 years. Have already had the front end rebuilt, reduction hubs re-done, gear box mostly sorted, and am now onto the engine.
The shell went to the blasters on Monday and just got her back today - so panel works starts tomorrow.
We are into it pretty hard, so am hoping that we will have the majority of the work sorted within 4 to 6 weeks. Have found a terrific x panel master who is taking care of the panels, rust etc. Fortunately the bus has only ever had one repair job, and the rest is rust - of which their isn't a lot.
Anyway, enough chit chat - here are some pics. Will post some more post blasting tomorrow.
- Attachments
-
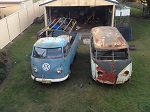
- Her first day at home
- IMG_2156.jpg (68.72 KiB) Viewed 3048 times
-
- Stripped and ready for blasting
- IMG_2309.jpg (65.5 KiB) Viewed 3048 times
-
- IMG_2324.jpg (62.9 KiB) Viewed 3048 times
-
- IMG_2318.jpg (67.86 KiB) Viewed 3048 times
-
- IMG_2321.jpg (63.3 KiB) Viewed 3048 times
Last edited by New dude on Wed Jun 24, 2009 9:34 pm, edited 7 times in total.
- splitbus
- DSKer
- Posts: 3232
- Joined: Sun Dec 09, 2007 7:47 am
- Location: Brisbane Northside
-
- DSKer
- Posts: 258
- Joined: Sun Aug 14, 2005 10:45 pm
- Location: NORTHERN RIVERS NSW
- D-Train
- DSKer
- Posts: 3496
- Joined: Mon Nov 28, 2005 3:03 pm
- Location: coffs harbour
- Dasdubber
- DSKer
- Posts: 1847
- Joined: Thu Dec 01, 2005 10:18 pm
- Location: Gold Coast
-
- DSKer
- Posts: 4516
- Joined: Mon May 16, 2005 12:56 am
- Contact:
- Leroy
- DSKer
- Posts: 2544
- Joined: Thu Jul 05, 2007 11:58 pm
- Location: Brisbane (bayside)
-
- DSKer
- Posts: 194
- Joined: Tue Feb 19, 2008 9:14 pm
Some more piccies - at the beaters
Hi guys,
Well, the panel master (Geoff) is working his magic. I have ordered as many panels and parts as I can (within reason), including inner and outer LHS sill (with strengthener, battery tray, LHS rear 1/4 and the list goes on (thanks roy from the Bus Stop)
Essentially, this bus was originally a 62 standard kombi - so 11 windows, no rear seats and the one base colour.
I am turning it into an 11 window deluxe, two tone tourquiose (sp?), white, with cosmo green interior. Brad from Bus n Bug has been of great assistance thus far!
Originally this was going to be a daily driver, but with everyone's enthusiasm, I am thinking this might end up being a show car/daily driver - so am trying to do it og.
Anyway, here are some of the pics of work that haa happened in the last two days thanks to Geoff's hard work!
The blasters did a great job - no warping at all!
J
- Attachments
-
- LHS nose - new plate, cut out the few pin holes, and recessed new plate within.
- IMG_2370.jpg (49.8 KiB) Viewed 2924 times
-
- Another view of the same
- IMG_2371.jpg (45.46 KiB) Viewed 2924 times
-
- this one is going to need some work!
- IMG_2372.jpg (46.77 KiB) Viewed 2924 times
-
- Cut out and replaced - a bit more grinding and some filler should see this back to perfect
- IMG_2398.jpg (43.63 KiB) Viewed 2924 times
-
- Another section cut out, replaced and treated - he's doing a good job
- IMG_2399.jpg (51.87 KiB) Viewed 2924 times
-
- Touching up a few holes in the floor.
- IMG_2383.jpg (47.55 KiB) Viewed 2924 times
-
- more work
- IMG_2396.jpg (40.03 KiB) Viewed 2924 times
-
- to be beaten
- IMG_2397.jpg (32.52 KiB) Viewed 2924 times
-
- couple of more holes
- IMG_2379.jpg (34.92 KiB) Viewed 2924 times
-
- New battery tray is on its way
- IMG_2376.jpg (35.91 KiB) Viewed 2924 times
Last edited by New dude on Mon Apr 14, 2008 5:10 pm, edited 1 time in total.
- matara
- Admin
- Posts: 1472
- Joined: Wed May 18, 2005 11:34 pm
- Location: Wahroonga, Sydney
- Contact:
-
- DSKer
- Posts: 194
- Joined: Tue Feb 19, 2008 9:14 pm
Hey Steve,
No prob's, they used Garnett, went full tilt underneath (Geof and I dropped the box and front end to make sure we could get to it all) and wound it right back for the larger panels. He didn;t do the inside of the roof or the interior panels - just the ribbing. Anyway, the dude was super careful and I am chuffed with the job!
- no show
- DSKer
- Posts: 1102
- Joined: Tue May 17, 2005 8:31 pm
look at its lower nose , could be the only one left with no ding as it came from factory
sweet ride i must admitt i liked it in the og paint, but i am sure it will look a million bucks with a fresh new look.
still cant get over that original paint was some of the nicest i have seen.
i guess i am going to have to get over it as its gone forever very nice bus for sure
sweet ride i must admitt i liked it in the og paint, but i am sure it will look a million bucks with a fresh new look.
still cant get over that original paint was some of the nicest i have seen.
i guess i am going to have to get over it as its gone forever very nice bus for sure
- Volksaddict
- DSKer
- Posts: 622
- Joined: Mon Jun 27, 2005 3:27 pm
- Location: Sawtell mid northcoast NSW
-
- DSKer
- Posts: 194
- Joined: Tue Feb 19, 2008 9:14 pm
Hi All,
Got a few more pics of the work in progress this week
- Attachments
-
- Right hand side - now done the same as the left.
- DSCF0017.jpg (30.04 KiB) Viewed 2765 times
-
- that should fix the rust!
- DSCF0015.jpg (44.34 KiB) Viewed 2765 times
-
- the battery tray had a few holes
- DSCF0002.jpg (38.06 KiB) Viewed 2765 times
-
- DSCF0004.jpg (45.07 KiB) Viewed 2765 times
-
- DSCF0018.jpg (33.72 KiB) Viewed 2765 times
-
- DSKer
- Posts: 194
- Joined: Tue Feb 19, 2008 9:14 pm
G'day one and all.
Here are some progress shots - work to date. Just waiting on the new floor section to arrive - so onto some panel straightening now. Some shrinking of the roof from a previous roof rack is needed and a little more straightening.
Geoff is doing a great job of the panels and taking real care to get her back to original - it's nice to meet a bloke who has so much passion!
Anyway, enjoy.
- Attachments
-
- How good is that looking!
- DSCF0044.jpg (58.47 KiB) Viewed 2721 times
-
- hmmmm - nice
- DSCF0043.jpg (41.76 KiB) Viewed 2721 times
-
- Just got to whack that heater pipe back in and we're lookin good
- DSCF0042.jpg (54.54 KiB) Viewed 2721 times
-
- Amazing what a bit of TLC can do
- DSCF0039.jpg (55.33 KiB) Viewed 2721 times
-
- swiss cheese had to go!
- DSCF0037.jpg (40.88 KiB) Viewed 2721 times
-
- oh crap - that doesn't look so good does it
- DSCF0036.jpg (45.39 KiB) Viewed 2721 times
-
- hmmmm
- DSCF0032.jpg (45.35 KiB) Viewed 2721 times