59 Split 11 Window - Resto

Post pics and info of your rides here split windows only

Moderators: warb, Rawdyn, Leroy, byronbus, Tonz Magonz, dmb

Post Reply
User avatar
chillax
DSKer
Posts: 172
Joined: Sun Feb 24, 2008 1:56 pm
Location: Brisbane

Post by chillax »

Hey Guys,
Finally most of the remainder panels have arrived today (Gerson floor sections and doglegs), so we are pretty much now good to go.
The only panels left we are waiting for is the roof sections (autocraft) and the rear corners (autocraft).


Here are some update pics :)

Middle seat bases looked okay upon initial inspection but around the edges, you could see problems lurking (like everywhere else on this bus!)
Image

After the base plates were removed, the rust was evident, thus cut out and to be replaced with fresh metal
Image

After much discussion, the best option for floor repair was to use Gerson side repair sections (as full floors weren't available quickly enough), so the existing floor was cut and prepped
Image

Trial fit got us a little excited as finally things feel like they are moving forwards!
Image


Jack
User avatar
OMR_007
DSKer
Posts: 657
Joined: Mon Feb 25, 2008 10:45 pm
Location: Brisbane

Post by OMR_007 »

WOOHOO ... got to love new metal going back in after seeing so much come out! :D
I'm guessing the Gerson sections went in like a breeze?
Keep going, keep going!
User avatar
chillax
DSKer
Posts: 172
Joined: Sun Feb 24, 2008 1:56 pm
Location: Brisbane

Post by chillax »

Another day, another update :)

This was the last remaining rusty section in the engine lid to repair
Image

A donor section was grafted in (after reshaping) from the bay window lid which donated its inner hinges etc
Image

After some careful welding and grinding it came out very nicely
Image

The floor on cargo door side was welded in today (Cleco fasteners shown here before welding)
Image

The cargo doors were stripped further today and rust treated on the inner frame
Image

After the rust converter was applied (neutralised with damp rag, then metho), some rust preventative paint was applied
Image

Both doglegs are now removed (lots of spot welds!), and Gerson legs ready to go in after some final repairs of leading edge of b-pillars
Image


Jack
Hoves
DSKer
Posts: 1085
Joined: Mon Oct 30, 2006 4:46 pm
Location: Queensland

Post by Hoves »

There is no doubt about it Jack - this is one full on resto. Great to see it all coming together.
User avatar
byronbus
Admin
Posts: 7840
Joined: Mon May 16, 2005 10:45 pm
Location: Byron Bay

Post by byronbus »

Wow, wish i had those skills, thanks for the detailed pics, loving watching.
User avatar
kombi_maniac
DSKer
Posts: 404
Joined: Thu Mar 22, 2007 9:22 pm
Location: Goldcoast

Post by kombi_maniac »

Jesus that is thorough Al! very impressive stuff, shes gunna be like new when its done!

Chillax u must b stoked!!
User avatar
chillax
DSKer
Posts: 172
Joined: Sun Feb 24, 2008 1:56 pm
Location: Brisbane

Post by chillax »

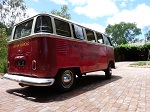
Cheers for the comments guys, its def a full on resto 8)
A heap of work has happened over the past 2 weeks! :)
I finally got to look at the pics, as we only just got the internet reconnected (moving house).

Anyway, here is the overload of pics :D


The top hat sections were rust converted then painted before the new floor section went down
Image

The rust is everywhere in this bus :)
Image

We will have to count the number of repair pieces in the bus once all done - a lot of new metal has gone in, here are a few more "to do"
Image

Colour was squirted on the inside nose section (beige grey)
Image

Same pic without flash - base coat/clear coat used
Image

Image
Inside of the nose was also painted before the skin goes on

Image

Inside windscreen section also painted before it is fixed in place
Image

Engine lid was finally painted in epoxy primer then high build primer ready for a guide coat and more sanding
Image

Cargo doors were refitted today to manipulate the gaps before the lower inner frames were cut out
Image

Cargo doors were refitted today to manipulate the gaps before the lower inner frames were cut out
Image

Engine lid was trial fitted today to check gaps and do any adjustments necessary before it comes back off
Image

The outer nose was trial fitted today finally - Cleco fastened in place along with outer valance to get the alignment right
Image

Steve welded up the outer valance and applied rust preventative paint on areas that will be inaccessible once nose is on
Image

The Gerson sections fitted extremely well apart from a slightly excessive length - thus had to cut a small section out and trim to fit in the corners
Image

This cut and shut process resulted in a correct profile and better fit
Image

Same door, different view
Image

The door pin guide had to be salvaged from the old door and welded in the correct position so the door would shut and stay in nice and tight
Image

Same process was undertaken for the front cargo door
Image

After all the welding of the inner frames and realigning the hinges things were looking pretty good (fit wise)
Image

Outer skin on the front cargo door was trial fitted to check gaps etc
Image

Then the rear was fitted with Clecos temporarily - both skins will now come off to paint inner frames and inside door skins
Image

The nose skin was welded in place today and the lips were folded over the a-pillars and outer valance
Image


Jack
Last edited by chillax on Tue Oct 21, 2008 8:54 pm, edited 1 time in total.
User avatar
chillax
DSKer
Posts: 172
Joined: Sun Feb 24, 2008 1:56 pm
Location: Brisbane

Post by chillax »

Almost forgot, a huge thanks to Hoves for the help with the colour codes of the top colour, beige grey, :D
User avatar
warb
Mod
Posts: 7511
Joined: Mon May 16, 2005 5:15 pm
Location: Penrith, Nsw, Australia
Contact:

Post by warb »

lovely.. makes me feel lucky for the first bus being non crusty.... just the second one that worries me..
Hoves
DSKer
Posts: 1085
Joined: Mon Oct 30, 2006 4:46 pm
Location: Queensland

Post by Hoves »

Very good stuff Jack. This will be one hell of a bus.
User avatar
OMR_007
DSKer
Posts: 657
Joined: Mon Feb 25, 2008 10:45 pm
Location: Brisbane

Post by OMR_007 »

You must be getting excited Jack, even seeing a little bit of paint go on is a sweet thing 8)
Moving house? What happened to reppin the 4171? :shock:
User avatar
morts
DSKer
Posts: 2097
Joined: Sun Oct 29, 2006 9:22 pm
Location: McLaren Vale, South Australia

Post by morts »

Very impressive re-build - this one will be better than new I expect!
No matter what happens they can't take you out in the street and shoot you......
User avatar
chillax
DSKer
Posts: 172
Joined: Sun Feb 24, 2008 1:56 pm
Location: Brisbane

Post by chillax »

I know i know, moving from the 4171, after being born and raised :o
Now we are 4178 (to the bay), will not be the same

Oh and here is the update for this week so far :)


Autocraft windscreen surround was not a great fit so needed some work during trial fits
Image

Cargo door skins were tacked in place - upper joint is fully seam welded but is a lap joint rather than butt for strength (weld through primer used on mating surfaces to avoid corrosion plus seam sealer on inside joint)
Image

Both upper and lower horizontal surfaces of the windscreen surround had to be cut and shortened, then rewelded
Image

Cleco's help to keep it in position during trial fits and plug welding
Image

Both cargo door skins were fully welded in - finally the bus is coming together!
Image

Apart from fabricating a new inner skin closing plate around the windscreen the nose is finally done
Image

After about 4 days solid of work just on the nose it is looking like a bus once again - well done to Steve for his persistence on this one!
Image


Jack
User avatar
joshroom
DSKer
Posts: 487
Joined: Sat Jul 21, 2007 11:08 pm
Location: perth

Post by joshroom »

that exelent stuff man, please tell us more about these clecos ive never seen or herd of them before
____________
User avatar
Dasdubber
DSKer
Posts: 1847
Joined: Thu Dec 01, 2005 10:18 pm
Location: Gold Coast

Post by Dasdubber »

Cleco fasteners were designed (I think) primarily for the aircraft industry - they basically allow you to hold together two pieces of metal (like a temporary pop rivet) but is easily removable as many times as you want with the pliers. They are great when trial fitting panels as you only need to drill a small hole (1/8in for example) which is easy to weld up.

If you pop in "cleco" in egay there are always pliers/cleco's for sale - not too exy.
Al
Post Reply