Longimanus is sniffing a barny's bum
59 Split 11 Window - Resto
Moderators: warb, Rawdyn, Leroy, byronbus, Tonz Magonz, dmb
-
chillax

- DSKer
- Posts: 172
- Joined: Sun Feb 24, 2008 1:56 pm
- Location: Brisbane
-
chillax
- DSKer
- Posts: 172
- Joined: Sun Feb 24, 2008 1:56 pm
- Location: Brisbane
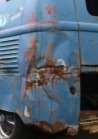
The rust in the side windows was repaired today

Holes were drilled in the outer repair section so it could be plug welded to the inner repair section once in place

All three inner frames had similar problems to this which required repair

So tonight they were all done - unfortunately still more rust to fix though! One repair at a time

Onto the cargo door repairs then including pulling out some dents

The lap joint of new skin was filled after treating the entire panel with deoxidine ot condition the bare metal. More work to come after the doors are primed.

Holes were drilled in the outer repair section so it could be plug welded to the inner repair section once in place
All three inner frames had similar problems to this which required repair
So tonight they were all done - unfortunately still more rust to fix though! One repair at a time
Onto the cargo door repairs then including pulling out some dents
The lap joint of new skin was filled after treating the entire panel with deoxidine ot condition the bare metal. More work to come after the doors are primed.
-
chillax
- DSKer
- Posts: 172
- Joined: Sun Feb 24, 2008 1:56 pm
- Location: Brisbane
Creative Safaris went in today 
The slightly bigger seal was used from Clark Rubber ("pinchweld small" Clark product code is 19899 manufacture code is 322077, thanks Kanaka) to hopefully make sure there are no leaks.
The centre bracket had to be cut down the middle then welded on individually (each side) to get the fit right


Safaris will be removed and frames painted to match body colour

Jack
The slightly bigger seal was used from Clark Rubber ("pinchweld small" Clark product code is 19899 manufacture code is 322077, thanks Kanaka) to hopefully make sure there are no leaks.
The centre bracket had to be cut down the middle then welded on individually (each side) to get the fit right
Safaris will be removed and frames painted to match body colour
Jack
-
frenzix
- DSKer
- Posts: 4516
- Joined: Mon May 16, 2005 12:56 am
- Contact:
-
chillax
- DSKer
- Posts: 172
- Joined: Sun Feb 24, 2008 1:56 pm
- Location: Brisbane
The seals used for the safaris are a seal brought from clark rubber (supposed to be better quality and slightly bigger profile).
The seal is called "pinchweld small" Clark product code is 19899 manufacture code is 322077.
A little bit more primer to report
The cargo doors and rear panel were prepped and primed - looking better slowly but surely

Still waiting on the lower b-pillar, once that arrived the left dogleg can go in

Engine tinwear was sanded and primed ready for some colour soon (waiting on the alternator backing plate and rear firewall tin)

Jack
The seal is called "pinchweld small" Clark product code is 19899 manufacture code is 322077.
A little bit more primer to report
The cargo doors and rear panel were prepped and primed - looking better slowly but surely
Still waiting on the lower b-pillar, once that arrived the left dogleg can go in
Engine tinwear was sanded and primed ready for some colour soon (waiting on the alternator backing plate and rear firewall tin)
Jack
-
shark

- DSKer
- Posts: 967
- Joined: Mon Aug 25, 2008 3:14 pm
- Location: Northern Beaches, Sydney
-
Dasdubber

- DSKer
- Posts: 1847
- Joined: Thu Dec 01, 2005 10:18 pm
- Location: Gold Coast
Yep, both buses will run the clark rubber seals - we (well mostly Steve) took a lot of care in doing trial fits during bracket and catch plate positioning to ensure an even seal/pressure around the entire frame especially bottom corners. I will have my fingers crossed neither will leak!shark wrote:Looking good Jack I think Al ised the same seals for my Safari's which were only put in last week.
Al
-
greenbus
- DSKer
- Posts: 440
- Joined: Thu May 19, 2005 11:55 pm
- Location: Canberra Australia
-
chillax
- DSKer
- Posts: 172
- Joined: Sun Feb 24, 2008 1:56 pm
- Location: Brisbane


-
chillax
- DSKer
- Posts: 172
- Joined: Sun Feb 24, 2008 1:56 pm
- Location: Brisbane
The rusty bent up section where the popout hinge mounts to needed replacing

After being cut out, it was replaced with fresh steel, butt welded in and dressed smooth

Had to drill the holes in the nose for the VW badge so trial fitted one in place

After three days of beating, shrinking, beating, sanding, filling, sanding, filling and more sanding, the long side is finally in primer!


The nose was re-primed after its first gudie coat/block sand....time for another round now!

Light guide coat will reveal low spots during torture board sanding!


After being cut out, it was replaced with fresh steel, butt welded in and dressed smooth
Had to drill the holes in the nose for the VW badge so trial fitted one in place
After three days of beating, shrinking, beating, sanding, filling, sanding, filling and more sanding, the long side is finally in primer!
The nose was re-primed after its first gudie coat/block sand....time for another round now!
Light guide coat will reveal low spots during torture board sanding!
-
muzza72
- DSKer
- Posts: 624
- Joined: Tue Dec 13, 2005 6:55 pm
- Location: northern beaches sydney
-
splitbus07
- DSKer
- Posts: 615
- Joined: Thu Nov 08, 2007 11:43 am
- Location: North Balgowlah, Sydney
-
chillax
- DSKer
- Posts: 172
- Joined: Sun Feb 24, 2008 1:56 pm
- Location: Brisbane
ive got some more pics!
B-pillar finally arrived after a long wait

The inner hinge plate had to be adjusted again for clearance (would have been nice to have had the b-pillar section when the cargo doors were aligned!)...ah well

Steve then got onto installing the inner dogleg

After hanging the cab door, both top and bottom hinges had to be straightened out to try and get the door to fit (more work tomorrow)

Will be nice to have the dogleg on!

The last of the engine tinwear arrived today so it was sanded, prepped, primed and painted in beige grey tonight.

Engine can start to come together slowly but surely now!

After trying to get the original buckled passenger door to fit for more than enough hours, a decision was made to use another donor door to make the process easier - so far a much better fit

B-pillar finally arrived after a long wait
The inner hinge plate had to be adjusted again for clearance (would have been nice to have had the b-pillar section when the cargo doors were aligned!)...ah well
Steve then got onto installing the inner dogleg
After hanging the cab door, both top and bottom hinges had to be straightened out to try and get the door to fit (more work tomorrow)
Will be nice to have the dogleg on!
The last of the engine tinwear arrived today so it was sanded, prepped, primed and painted in beige grey tonight.
Engine can start to come together slowly but surely now!
After trying to get the original buckled passenger door to fit for more than enough hours, a decision was made to use another donor door to make the process easier - so far a much better fit
-
chillax
- DSKer
- Posts: 172
- Joined: Sun Feb 24, 2008 1:56 pm
- Location: Brisbane


-
FrankenCab
- DSKer
- Posts: 3528
- Joined: Wed Apr 18, 2007 8:55 pm